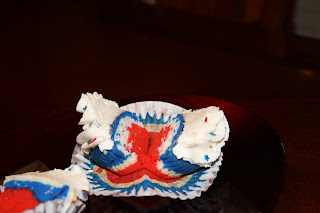
I had so much fun with the Red, White and Blue-tiful cupcakes, I decided that coloring the batter wasn't enough. I wanted to try my hand at colored icing for some more patriotic cupcakes! I had seen multi-colored frosting at my local bakery and thought the idea was super cute. I briefly went online to look up how to do it, then forgot about. Then, my friend over at AJ's cupcakes tried it out, and her's turned out super cute and she provides nice instructions as well. Then, once again, I kinda forgot about it. Well, like I mentioned earlier, I wanted another idea for patriotic cupcakes, and I remembered I really wanted to try this technique so I set out to figure this out. When I went online, I could not easily find visual instructions on how to do the mutli-colored frosting; all I could find was written intructions. Now, I'm not saying they aren't out there, I just couldn't find them! Did I look hard, no, but that's neither here nor there ;) I'm very visual, so this project seemed a bit intimidating, but I was determined to figure it out AND document it in pictures.
First, make a batch of your favorite buttercream icing. I find the basic Wilton buttercream icing works great. Minimal ingredients and nice texture. Divide the batter into how many icing colors you need. Now I tried for three, but did not have a decorating bag big enough to hold three, so I ended up only being able to use two icing colors at a time.
After your icing is dyed your desired colors, lay out a piece of Saran wrap and plop some icing down on top of it.
Then roll the Saran wrap up and start to flatten the icing until it's long and round, about the length of the decorating bag you are using. Then, secure it at one end. Repeat for the remaining colored icing you have.
Once all of the icing is rolled into Saran wrap, load them into your decorating bag.
From here, you can just start piping onto your cupcakes, but I did a couple of test swirls to ensure the icing was coming out evenly distributed.
Now, here is where I realize these are in no way looking patriotic anymore :-(. I immediately thought they looked like Chicago Cubs colors, hence why I am calling them Cub-Cakes. Now, slight problem. There are no Cubs fans in my house, or anywhere near my house. I have a lot family in Chicago, one side of the family would really like these. The other side, not so much. If you're my family and you're reading this, you know which side you're on and if you're on the Cubs side, I wish I could hand deliver these to you now!!
So, that was my project for the night. They turned out not quite what I was looking for, but I did learn what I set out to do with the multi-colored frosting, so I am a happy baker right now. I think next time I'll try a different decorating tip and maybe different colors ;)
xoxo,
Katie
I am a mom to two wonderful boys and as a hobby I love to bake. My favorite things to bake are cakes, cupcakes, and cookies. I love finding the best made from scratch recipes.
Friday, June 24, 2011
Tuesday, June 21, 2011
Red White and Blue-tiful Cupcakes
For Fourth of July, I knew I wanted to make some fun cupcakes. I'd had this idea that I came up with, based on the Colorburst cupcakes I had recently made that were inspired by the Our Best Bites Blog.
I wasn't sure if they would turn out as cute as the image I had in my head, because sometimes working with darker colors, like red, can be tricky. But, I'm actually super happy with the end result. I will actually be making them again soon for a Bake Sale in which I am donating them to. This Bake Sale is for a co-worker who was recently injured. So, this batch was a test run for the bake sale. These are pretty easy to make, so I included all of the steps, in case you want to try them yourself!
To start off, I dumped all the ingredients into the mixer.
**I am going to confess- this is a boxed mix. Yes, I said it, boxed. Normally, I really enjoy baking cakes from scratch, but during the week I only have from after dinner, until bed time to complete my baking projects, so I went for easy!**
After all the ingredients are well blended together, I measured the total amount of matter and then divided the batter into three measuring cups and dyed one red, one blue, and left one white. I chose white cake for this reason- so one of the batters could remain white.
Next, I layered the three batters into cupcake liners. I went to Hobby Lobby and found some cute festive ones for Fourth of July.
Then, watch 'em bake. Now, you could stand right in front of the oven and just watch them like a hawk, as my two year old did. Or you can just set a timer and walk away.
After they are done baking and cooling, it's time to ice and decorate them! Just use your favorite icing. For mine, I used a 1M Wilton tip to make a classic swirl on top. You could stop here, but I thought mine were missing somethiing.
So while I was at Hobby Lobby getting the liners, I also found these cute star sprinkles, so I added those.
And then for the final touch, I made red fondant stars, and brushed edible glitter dust on them.
What the real fun would actually be, was to rip the liner off and see the absolutely adorable red, white, and blue layers.
I wish you all a very happy Fourth of July! And hope we all take time to remember how lucky we are to live in freedom and thank those who have made, and continue to make that possible.
xoxo,
Katie
Subscribe to:
Posts (Atom)