Showing posts with label cookies. Show all posts

Wednesday, September 21, 2011

Cutest Candy Corn Cookies

I've recently acquired a mild addiction to Pinterest. Before Pinterest, I had my couple of blogs I followed faithfully, and that consumed waaay too much of my time! Now, with Pinterest the amount of time you can spend easily finding cute ideas is endless! I've discovered a million new blogs, and at least a trillion new recipes and baking ideas to try. Well I figured it was time to stop just pinning, and actually try one of these super cute ideas. So last night I made the Sparkling Candy Corn Cookies, which was featured on the Land O' Lakes website.

You need just a few pretty basic supplies for this. The cookie recipe has pretty simple ingredients. I think the only thing I didn't have on hand was the orange, everything else I already had in the pantry.


For the cookie recipe you'll need:
1 cup of butter, softened
1 cup of sugar
1 egg
2 T orange juice
1 t freshly grated orange zest
1/8 t salt
3 cups of flour
1/2 t baking soda
orange food color (I used in gel form)
yellow food color (I used in gel form)
1/2 sugar to make then sparkle after they are baked.
You'll also need a loaf pan, lined with waxed paper or plastic food wrap

The instructions on how to bake the cookies can be found at the Land O' Lakes website, but it's a very simple, basic cookie recipe. Cream the butter and sugar. Then add the egg, orange juice, orange zest, and salt. Beat until well mixed and then add the flour and baking soda until well combined.

At this point, I knew I would have to divide the dough into thirds. Some people are great at just eyeballing this kind of thing. Not me. I had to get out my kitchen scale and weigh the total weight of the dough, which was about 30 ounces. So I knew I had to make 3, 10 ounce balls.

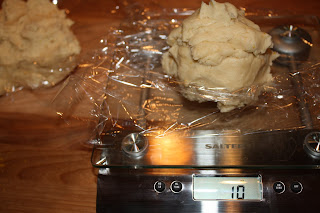

Then, take one of the balls of dough and just set it in the bottom of the loaf pan, and press it flat against the bottom. Next, dye one of the balls of dough orange, add it to the loaf pan and press until flat, then dye the last ball of dough yellow and do the same. The series of pictures below help illustrate the process.


When you're done your loaf pan should look like this.


Now, you'll want to refrigerate the dough for at least two hours, or overnight.

After two hours or overnight, remove the dough from the pan. I cut off the very edge of the dough, so that I could start with a nice even edge of dough. Then, just slice about a 1/4 inch off of the brick of dough and start cutting it at an angle. Then arrange them on an ungreased cookie sheet and bake at 375 degrees for about 9 minutes, depending on your oven.


Once you pull them out of the oven, if you're going to add the pretty sugar on top to make them "sparkle" only let them cool for a minute, so that when you put them in the sugar it sticks. If you are going to put the sugar on, just put 1/2 cup of sugar in a bowl, drop the cookie in and mix it around a bit.


When you're done, you have the cutest little candy corn cookies! I've included a picture of both sugared, and no sugar just in case you'd like to compare and see which you prefer!

Imagine how cute these would be in a favor bag with Halloween themed ribbon (as the video on the Land O' Lakes website suggests!).


xoxo,
Katie

Sunday, July 10, 2011

Chocolate Chip Cookie Dough Cupcakes

So, I've been wanting to make chocolate chip cupcakes for a while. They were right in line after the Grasshopper cupcakes. But, that was until I came across these Chocolate Chip Cookie Dough Cupcakes at Annie's Eats. They immediately trumped all previous plans for me to make any other recipe.

I have to admit- they were REALLY time consuming. In fact, I had to break the project up into two parts, taking two days. There were four parts to this cupcake- a cookie garnish, the actual cupcake, the filling, and the frosting. All the details on the recipe can be found here.

In a nutshell, here's how this project went down:

First, bake up some chocolate chip cookies. You could actually do this first, or last, it doesn't matter. I just chose this to be my first step. Since this recipe was so time consuming in general, I cheated here and strayed from the recipe. I used Nestle Tollhouse Mini Chocolate Chip Cookie Dough- Break and Bake style :) At Annie Eat's, she has what is supposed to be a fantastic chocolate chip cookie you could adorn these cupcakes with.


Next, mix up the cupcake batter, find some cute cupcake liners (mine are yet again from Michael's) and bake the cupcakes.


Then, it's time to work on the filling. And once the cupcakes are fully cooled, and the filling is chilled a bit, fill the cupcakes up. I chose to use a very small biscuit cutter to carve the center of the cupcakes out. If you don't have one, you could also use a small paring knife and just cut the center out. I typically like to use a decorating tip and pastry bag to fill my cupcakes, but since the filling has chocolate chips in it, that would not work this time. Also, you can either put the top you've cut out back on top, or just leave it off. I tried it both ways. Either way will work.


Once the cupcakes are filled, it's time to frost them! After you frost them, sprinkle some mini chocolate chips on top and adorn with the yummy chocolate chip cookies. Then, quickly devour one just to be sure they taste as good as they look!


These cupcakes are seriously yummy and very different than the cupcakes I normally make. In fact, my normally hard to impress husband told me these were his favorite cupcakes to date. I guess any recipe with 6 1/2 sticks of butter can't go wrong!

xoxo,
Katie

Sunday, August 22, 2010

M-I-C-K-E-Y MOUSE!!

For my son's second birthday, we decided to do all things MICKEY MOUSE!!! My husband and I designed the cake based on differnet designs we found off the internet. But, what ended up being my favorite treat from the party were the party favors. My mom and I took on the project of making a ton of these precious Mickey Mouse cookies. I hope you enjoy looking at them, because they were so fun to make and I got rave reviews on how yummy they tasted!


Monday, February 1, 2010

A Baby Shower

One of the sweet ladies I work with is having a baby boy! Mom and Dad both love sports, so a couple ladies from work threw her a sports themed baby shower! I was on tap for the cupcakes and cookies. I thought baseballs would be cute. They were a big hit at the shower. I did one dozen chocolate cupcakes, one dozen vanilla cupcakes, and then a dozen chocolate sugar cookies.

Friday, January 1, 2010

2010 is Here!

I can't believe it's time to ring in 2010 already. I wanted something festive and fun to ring in the New Year, so I made these fun NYE cookies for a small get together at my neighbor's house. Here's to another great year!


Sunday, December 13, 2009

Happy Birthday to my Hubby!

My husband turned 29 this year. That's right, just one more year til the big
3-0!! I told him he could pick out any cake he wanted. Well, he picked a cookie cake. Something I'd never made before. Geeez, thanks, Mike! Well, maybe I shouldn't be so sarcastic because it was actually quite fun to make! I made him a big snickerdoodle cake that tasted soo yummy. I got the recipe off of Bakerella's blog. I've made the cookies at least 5 times before, just never if the form of one giant one. It turned out so great, I had to make a second because the first one was gone before our family could eat it. I think we'll definitely be making more cookies cakes in the future for celebrations...easy, fun, and yummy...I think we found a winner!


**I don't know why I can't get this photo to turn right...just turn your neck a bit to view!**

Tuesday, December 1, 2009

Holiday Cookies

I recently took a couple of cookies decorating classes. I did a royal icing class, and then a fondant class. The fondant is SO much fun to work with. You can do so much with it, and it looks so clean and neat. Below are a couple of different designs I played around with at the class!!