Wednesday, September 21, 2011

Cutest Candy Corn Cookies

I've recently acquired a mild addiction to Pinterest. Before Pinterest, I had my couple of blogs I followed faithfully, and that consumed waaay too much of my time! Now, with Pinterest the amount of time you can spend easily finding cute ideas is endless! I've discovered a million new blogs, and at least a trillion new recipes and baking ideas to try. Well I figured it was time to stop just pinning, and actually try one of these super cute ideas. So last night I made the Sparkling Candy Corn Cookies, which was featured on the Land O' Lakes website.

You need just a few pretty basic supplies for this. The cookie recipe has pretty simple ingredients. I think the only thing I didn't have on hand was the orange, everything else I already had in the pantry.


For the cookie recipe you'll need:
1 cup of butter, softened
1 cup of sugar
1 egg
2 T orange juice
1 t freshly grated orange zest
1/8 t salt
3 cups of flour
1/2 t baking soda
orange food color (I used in gel form)
yellow food color (I used in gel form)
1/2 sugar to make then sparkle after they are baked.
You'll also need a loaf pan, lined with waxed paper or plastic food wrap

The instructions on how to bake the cookies can be found at the Land O' Lakes website, but it's a very simple, basic cookie recipe. Cream the butter and sugar. Then add the egg, orange juice, orange zest, and salt. Beat until well mixed and then add the flour and baking soda until well combined.

At this point, I knew I would have to divide the dough into thirds. Some people are great at just eyeballing this kind of thing. Not me. I had to get out my kitchen scale and weigh the total weight of the dough, which was about 30 ounces. So I knew I had to make 3, 10 ounce balls.

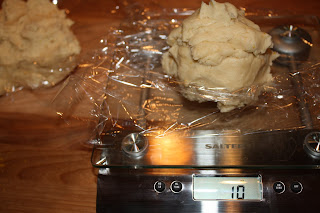

Then, take one of the balls of dough and just set it in the bottom of the loaf pan, and press it flat against the bottom. Next, dye one of the balls of dough orange, add it to the loaf pan and press until flat, then dye the last ball of dough yellow and do the same. The series of pictures below help illustrate the process.


When you're done your loaf pan should look like this.


Now, you'll want to refrigerate the dough for at least two hours, or overnight.

After two hours or overnight, remove the dough from the pan. I cut off the very edge of the dough, so that I could start with a nice even edge of dough. Then, just slice about a 1/4 inch off of the brick of dough and start cutting it at an angle. Then arrange them on an ungreased cookie sheet and bake at 375 degrees for about 9 minutes, depending on your oven.


Once you pull them out of the oven, if you're going to add the pretty sugar on top to make them "sparkle" only let them cool for a minute, so that when you put them in the sugar it sticks. If you are going to put the sugar on, just put 1/2 cup of sugar in a bowl, drop the cookie in and mix it around a bit.


When you're done, you have the cutest little candy corn cookies! I've included a picture of both sugared, and no sugar just in case you'd like to compare and see which you prefer!

Imagine how cute these would be in a favor bag with Halloween themed ribbon (as the video on the Land O' Lakes website suggests!).


xoxo,
Katie

Saturday, September 17, 2011

GIANT Icing Tips!

As you all know, I LOVE cupcakes (and cakes, and cookies, and well anything sweet!). Well, I also have a friend, Adrian, over at AJ's cupcakes that loves cupcakes. It's awesome having a cupcake loving friend. You get to share ideas, tips, and any other excitement that comes along with cupcakes. Well she recently shared with me a product she had recently purchased, "the original best ever cupcake icing kit". You can find it over at Bake It Pretty. I already have a TON of icing tips, some of them are pretty big. So at first I wasn't sure if I should get these tips. I thought maybe I had some of them. But even with all the tips I have, I always wanted the icing to go on the cupcake thicker, and look more whimsical. So, I kept thinking about these tips, not sure what I should do. Well, I happened to be over at Adrian's house celebrating a birthday and asked to see the tips in person, since she had already purchased them. Immediately upon seeing them, I knew I had to have them. I thought the tips I had were big; well not compared to these. These are GIIIIIIIIIANT and I love them! Once I got my own in the mail, I knew I was going to have to make cupcakes soon and check them out!


I had stocked up on Fun-da-middles since they were on sale recently and since I was short on time, just decided to use those. I went with the yellow cake and chocolate filling. Click here to view my previous post on making Fun-da-middles.

**I gotta be honest, I thought these were just ok. My favorite are still the yellow cake with vanilla filling.**

Then for the frosting, I just whipped up some buttercream and dyed it pink to match the liners. For the liners I once again used the Reynold Baked for You staybright baking cups. They are awesome and I prefer them over any cupcake liner. I can find them at my local grocery store. I am nervous because last time they were on clearance, so I am hoping they are not discontinuing this line.


Anyhow, after they cooled I tried out two of the tips and was really happy with them versus the smaller tips I've been using. I had no idea what my baking life has been missing! ;) Here's the final result!


I can't wait to try out the rest of the tips...there are still 3 more I haven't used!

xoxo,
Katie

Saturday, September 10, 2011

Vrrrrooooom Vrroooom!!!

I can't believe it, but my baby turned three a few weeks ago. I don't know where three years have gone. The two kiddos have been keeping me really busy, and then I also have a full time job, so I haven't been able to blog much. But, of course, I made time to make Mr B his own special birthday cake. We skipped the big birthday party hoopla this year, in favor of a more intimate gathering. The family went to Chuck E Cheese during the day, and then had a small celebration in the evening. B's birthday was on a Monday, so Chuck E Cheese wasn't crowded at all and both my boys could play to their heart's desire. Now, back to the cake details! It took me FOREVER to figure out what I was going to do for the design of this cake. I searched and searched for ideas online. Most had some intricate designs and moldings of the Cars characters. I really wanted to keep it simple, so I didn't want to start molding custom Cars characters. Finally, after searching and searching, this is what I came up with. I found this picture and modeled B's cake after it. I opted for buttercream frosting over fondant, simply because I like the taste better. A much smoother and neater cake surface would result from using fondant, but we're all about taste at my house! :) This was a homemade vanilla cake, and then the middle was homemade strawberry filling. I love the look of tall cakes, so I stacked three cakes. As you can see in the first picture, my son insisted on a Buzz Lightyear candle to be put on his Cars cake. This cake was super fun to make and my son loved it, so that makes one happy momma.

I have to thank my hubby for all his help too. He's become my partner in crime with the kids birthday cakes. He keeps me sane and calm during the decorating process. :)